Making the Premier Open-Source Fax Management System Even Better
faxguy@howardsilvan.comv4.2.2, 19 Oct 2005
This is a detailed guide to HylaFAX installation, configuration, and troubleshooting.
Open-source software is all about customization. So don't be surprised when most HylaFAX users consider customization a part of installation. In many cases some customization of the config files and the default coverpage will be necessary for desired HylaFAX functionality.
The config file contains all of the unique settings for a faxmodem. There are "default" settings built-into HylaFAX, but chances are good that all of these "defaults" are not appropriate or optimal for your particular faxmodem make, model, or firmware revision. There are many possible differences between one faxmodem and another, and if faxaddmodem does not create a suitable modem config file then in order to you will need your faxmodem AT and AT+F command set in order to properly modify the modem config file that faxaddmodem does create. These commands should be in the manual that [hopefully] came with your faxmodem.
If you do need to modify the modem config file in order for the modem to work properly with HylaFAX please
send a message to one of the mailing lists indicating your changes and the output of
probemodem.
For more information please consult hylafax-config(5F) and faxaddmodem(8C).
By far the easiest way to make most custom coverpages involves using using tgif. Tgif is availble at http://bourbon.usc.edu/tgif/index.html.
If your coverpage needs are simple enough for you to accomplish them directly from tgif then go ahead and draw the entire coverpage using tgif.
If tgif is not adequate to draw your coverpage then this is fine. Use any mechanism that suits you best to create a single page of Postscript output (EPS) that is your blank coverpage. One common way is to use a word processor such as Microsoft Word and to print the document to a file using the Apple Laserwriter printer (perferrably with the "EPS" option selected).
Take the resulting EPS file and "embed" it into a new tgif document object using tgif's File/Import feature. You'll only see the bounding box for the embedded EPS. Resize the box to fill the entire page (that should be the same page size as the original document).
Then add easily-identifiable one-word sample text (such as "XXXX-to" or "XXXX-from") to the tgif document object for each of the information fields on your coverpage excepting the comments section. Place the text for each field in approximately the place where you'd expect to need them on the page.
Now you cycle through a series of steps where you use tgif to "print" the document object to an EPS file and then you use a Postscript viewer such as Ghostview to view the EPS directly or you convert the EPS file to PDF with ps2pdf and then you use a PDF viewer to examine the resulting PDF. You should now see your original document with the one-word sample texts on the page. The sample text will not probably be exactly where you need them to be. So using the viewable document as a reference you make adjustments to the placement of the sample text in tgif. You repeat the print, view, and adjust sequence until all of the sample texts are where you want them to be.
Now take a text editor and edit the EPS file that you tgif "printed" from tgif. Search for your sample text.
Change the sample text sections into Postscript variables, this is usually done by removing the "XXXX" marker and
the accompanying parenthesis. For example, changing "(XXXX-from) SH" into
"from SH". See faxcover(1) for an exact list
of available faxcover variables.
Then, near the bottom of the file you'll want to add the comments section with the BreakIntoLines routine.
Here is a sample BreakIntoLines routine also showing the placement within the PostScript
file:
PostScript is read top-to-bottom, right-to-left. There are 72 points in an inch, and the origin is the bottom-left corner
of a page. Thus the routine above uses the 11 point
Courier font; defines a
line "rule" to be the size of a long run of underscore characters; defines the beginning (x, y) location to be (72, 252) or
an inch in from the left-side of the page and three and a half inches up from the bottom; and moves downward 15 points for
every new line.
/Courier findfont 11 scalefont setfont
/rule (___________________________________________________________________) def
/y 252 def /x 72 def
y -15 50 { x exch M rule S } for
rule stringwidth pop 20 x y comments BreakIntoLines
grestore

end
showpage
Once you have the BreakIntoLines routing in the right place at the end of the document you'll want to use faxcover to use your edited EPS file to generate some sample coverpages. Refer to the faxcover man page and supply it with information (command-line arguments) for each Postscript variable on your page as well as a lengthy string of comments (you want to see how the line wrapping goes). You'll probably notice that your comments section is not in the right place. This is expected. You'll need to modify the BreakIntoLines routine to get it placed right and sized properly for your page. You'll do this by making adjustments and then testing as you have repeatedly until things are correct.
Now you have a customized coverpage template. Replace the default HylaFAX coverpage.ps file with it or always specify the new coverpage (with the "-C" option) in your sendfax and faxmail calls.
For more information, refer to faxcover(1).
faxcron is a command script that does routine upkeep tasks in a HylaFAX spooling directory hierarchy. This script is intended to be invoked from cron(8C) on behalf of the fax user once a day, with the standard output sent by mail to the HylaFAX administrator. In conjunction with recvstats, xferfaxstats, info, and other HylaFAX utilities, the fax administrator can receive informative daily fax reports.
See faxcron(8C), recvstats(8C), xferfaxstats(8C), and hylafax-info(5F) for details.
Caution: Unless you use the sendfax '-w' option in a loop to queue your outbound
faxes, all of the faxes enter the fax queue at the same time, almost.
A fax job can be in the queue idle for long periods of time and reach its "KillTime", waiting for other fax
jobs to complete, without ever being attempted once. Therefore, if you queue enough faxes such
that the last fax will not complete before the configured KillTime (default is three hours),
some faxes will be removed from the send queue before ever being attempted, specifically all
of the faxes that have not completed by the configured KillTime.
To compensate for this, it is advisable that you use the sendfax '-k' option, or that
you modify KillTime in your ~/.hylarc, sendfax.conf, or hyla.conf files so that all of your
faxes have time to complete. See sendfax(1) for details.
Re-run faxaddmodem for each faxmodem in the system. By default, HylaFAX will route outgoing faxes through any available modem.
Modems may be "grouped" so that any particular job by be performed by any modem in a particular ModemGroup. For specific information, see ModemGroup in hylafax-config(5F).
If you want a group of send-only modems and a group of receive-only modems, instead of using ModemGroup, consider setting
RingsBeforeAnswer: 0 for the send-only modems and ModemReadyState: D for the receive-only modems.
There are a couple of common ways to establish a send-only environment.
faxmodem sends a message to the HylaFAX queuer process faxq telling it that the specified modem is ready for use and informing it about its fax-related capabilities. Once a modem has been configured its status can be reconfigured using the faxstate program. faxmodem can also be used to alter the capabilities and usage priority of a previously configured modem.
See faxmodem(8C) and faxstate(8C) for more information.
faxqclean is a program that processes completed HylaFAX jobs and expunges unreferenced document files. This program is intended to be invoked by cron(8C) on behalf of the super user (i.e. root) one or more times a day.
See faxqclean(8C) for more information.
To automatically print incoming faxes to lpr, insert a line of code similar to
/usr/bin/tiff2ps -a $FILE | lprinto your faxrcvd script, assuming that your printer is PostScript compatible.
Dieter Kluenter dkluenter@gmx.de has added at line 112 of faxrcvd these lines for his printing:
----snip--------
if [ -n "$SENDTO" ]; then
	echo ""

  	echo "The facsimile was automatically dispatched to: $SENDTO."
    else
	$TIFFBIN/fax2ps $1 | lpr -Plp
     fi
-------snap-------
Michael mwu@mail2.tercel.com.tw states:
    Our printing environment is specific, a shared HP LJ1100 (A4 only).
To be able to print out various types of paper sizes, we use the
following code for printing (0.95 * A4 size):

    /usr/bin/tiff2ps -a -h 11.1082 -w 7.8543 $FILE | /usr/bin/lpr

If we use fax2ps, it would be complicated to handle the printouts of
different paper sizes.
Empty the contents of these directories:
/var/spool/hylafax/doneq

/var/spool/hylafax/recvq

/var/spool/hylafax/log

/var/spool/hylafax/sendq

/var/spool/hylafax/docq

/var/spool/hylafax/pollq
Where /var/spool/hylafax is your $SPOOL directory.
Create a shell script etc/FaxDispatch (usually
/var/spool/hylafax/etc/FaxDispatch) which sets SENDTO to a valid
e-mail address. By using FaxDispatch, the HylaFAX administrator can route received fax notifications
and, if desired, the fax image directly to the intended recipient.
The following shell variables are available for use in FaxDispatch:
	CIDNUMBER	the CIDNumber value determined from faxgetty
	CIDNAME		the CIDName value determined from faxgetty
	CALLID1...N	the associated CallID value (1...N) determined from faxgetty
	DEVICE		the device name (i.e. ttyS1) of the receiving modem
	FILE		the filename (including path) of the tif fax image
	FILENAME	the filename (excluding path) of the tif fax image
	SENDER		the TSID of the fax sender

	FILETYPE	the type of file attachment to use (ps, tif, pdf)
	MIMENCODE	the program for encoding binary mail attachments
	SENDTO		the destination e-mail address of the notification
These are all generally considered read-only values except for MIMENCODE (which defaults to
mimencode), FILETYPE (defaults to ps), and SENDTO (no default). A good
example is given in 'man faxrcvd', however, a simple usage would be:
	SENDTO=FaxMaster;
	FILETYPE=tif;
Some users wish to have copies of the faxed documents returned to them via e-mail. In HylaFAX versions 4.2.0 and later this is
natively configurable. To do this, create the file etc/FaxNotify in the HylaFAX spool directory containing these
line:
RETURNFILETYPE=pdf;This will make any sent-job notifications (which occur based on the notification setting specified by the submission client) contain attachment with a copies of the faxed documents. See '
man notify' for
more specific information.
To localize (put into a local language) e-mails that are sent by faxrcvd, notify, and pollrcvd set the
LANG environment variable to the appropriate value like this in etc/FaxDispatch, etc/FaxNotify, or
etc/PollDispatch respectively:
LANG=es_MXAvailable
LANG settings are: pl_* (Polish), fr_* (French), it_* (Italian), pt_BR (Portuguese, Brazil), pt_* (Portuguese), es_* (Spanish), de_*
(German), ro_* (Romanian), and defaults to English. Customizations to the translations may be performed by extracting settings from bin/dictionary and
putting a customized version of that setting in etc/FaxDictionary. An example of a customized setting would be:
DICTRECEIVEAGENT="Our Company FAX Server";If customizations require alteration of the
bin/faxrcvd, bin/notify, or bin/pollrcvd scripts then it is recommended
that a customized version of the script be placed in a new file such as etc/faxrcvd.custom and that the appropriate server or
modem configuration setting be modified to suit, like this:
FaxRcvdCmd: etc/faxrcvd.customIf a localization (LANG) setting is not available for your favorite language and you would like to contribute a translation, please copy a section out from
bin/dictionary and translate each setting and then mail those new settings to one of the support lists.
Most customizations other than wording that users generally want to make have to do with the appearance or formatting of the mail itself. This can be easily done without
modifying FaxRcvdCmd, NotifyCmd, or PollRcvdCmd. Again, copy the default script to a custom file name, for example
etc/custom-mail.sh. Remove from that file all parts except for the faxrcvd_mail(), notify_mail(), or pollrcvd_mail() function
(which is nearly at the top of the original file). Make your desired modifications to that function in your etc/custom-mail.sh file. When that's ready, then in
your etc/FaxDispatch file simply "include" your customized function which will effectively replace the default one like this:
. etc/custom-mail.shThis may sound more difficult than it really is. Here is an example customization which results in a received fax mail notification identical to the one produced by the "html-sample1" template found in the hylafax.org releases. Although the resulting mail looks the same, the control offered to the administrator through simple shell scripting is immeasureably greater than that offered to an administrator through a templating approach.
Here is an example customization which shows how to overlay data on-top of all pages of a received fax image before mailing the resulting image off as a PDF.
Here is an example customization which is to be included via etc/FaxNotify for job notification mails which results in a
single-page PDF attachment to the mail that contains the text of the notification message overlaying the image of the first page of the first fax document sent.
HylaFAX places a "tagline" at the top of every sent page of fax. This is usually required by telecommunications law. The tagline can be modified from its default setting
by working with the TagLineFont and TagLineFormat modem configuration parameters. The client may specify a substitution for TagLineFormat
if UseJobTagline is set to true (as it is by default). The default format is "From %%n|%c|Page %%P of %%T". See hylafax-config(5F)
for a detailed explanation of this format and the escape codes. The resulting characters in the tagline are imaged onto the page using the font indicated by
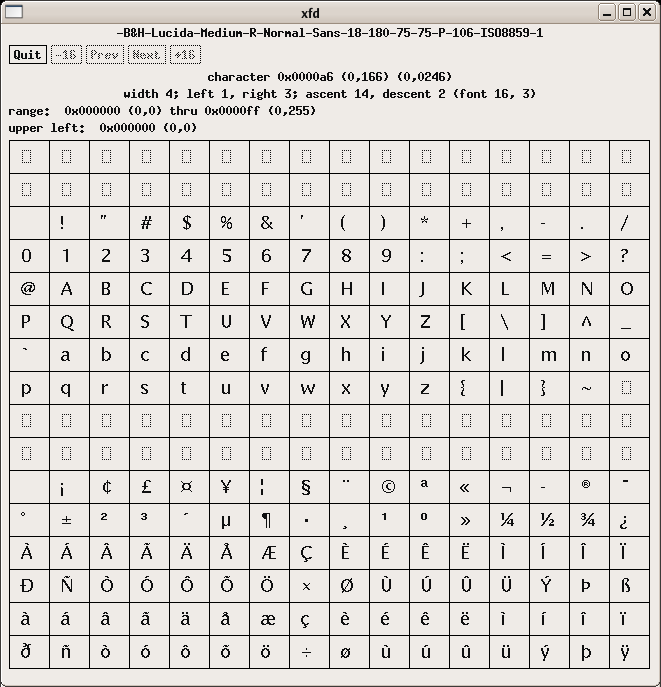
TagLineFont. The default font that comes with HylaFAX is LucidaSansTypewriter (etc/lutRS18.pcf) by Bigelow
and Holmes.
LucidaSansTypewriter contains only 214 printable characters and should work adequately for many languages using Latin-based characters.
Its character map can be viewed
here. It is encoded ISO-8859-1, and thus when relying on use of the high-bit
characters TagLineLocale: en_US.ISO-8859-1 should be configured.
The high-bit characters can be accessed directly by using the corresponding high-bit byte in TagLineFormat or by using
escaped octal numbers ("\xxx") as indicated in hylafax-config(5F) to indicate the same byte values.
Characters beyond those numbered 255 (0xFF, \377) may be referenced by encoding TagLineFormat with UTF-8. (HylaFAX+
5.1.12 or newer is required for this.) In this case the system-default for TagLineLocale will likely be set for UTF-8,
but may be explicitly specified as zh_CN.UTF-8 where "zh_CN" is your coded language_region setting. You will also need to
use a unicode (UTF-8 encoded) font for TagLineFont instead of the default HylaFAX font. An example is
GNU unifont by Roman Czyborra. Here is an uncompressed PCF
version of GNU unifont appropriate for use with HylaFAX.
Other fonts may be used instead of the default by appropriately configuring TagLineFont. Fonts should be of an uncompressed Portable Compiled Font (PCF) as
found in the X11 Window System. Character maps of fonts installed in X11 can be viewed using the xfd tool. PCF fonts can
be created, re-encoded, and altered using fontforge.
Be aware that the LucidaSansTypewriter font that is used by default has a size of 25 pixels. By comparison, GNU unifont has a size of 16 pixels. Thus, tag lines imaged using GNU unifont will appear 25% smaller than thosed imaged using the default font. This may or may not be desireable. Characters in the tag line are imaged 1-to-1 square at fine resolution (as fine resolution is roughly square itself). At normal resolution, because the resolution is oblong, every two pixel rows are merged together to form one pixel row so that the text does not appear stretched. (Thus small, detailed characters may become illegible at normal resolution.) At extended resolutions the characters are similarly stretched appropriately to compensate.
HylaFAX normally places all of its statistical logging information into the formatted xferfaxlog file. Many users find it better to have that same information inserted into a local database such as a MySQL table where it can be used with other accounting information. This is the purpose behind the etc/FaxAccounting feature that is described in the xferfaxlog man page. A sample FaxAccounting shell script is here. Remember that etc/FaxAccounting must be marked as executable by most HylaFAX processes.
If you can control the type of barcode the sender uses (and you usually can) then use a data matrix instead of a traditional 1-D barcode. Data matrix code library
and tools for both reading and writing data matrices are available at http://www.libdmtx.org/. Then, using libdmtx's
dmtxread tool reading the data matrix (in etc/FaxDispatch, for example) is as simple as...
DATAMATRIX=`/usr/local/bin/dmtxread $FILE`
... and then you can operate on $DATAMATRIX after that for whatever dmtxread was able to get out of $FILE.
If you cannot control the type of barcode the sender uses, then investigate Google's ZXing (http://code.google.com/p/zxing/).